Posts

The Benefits Of Matcha Green Tea

The Benefits Of Matcha Green Tea – Why you should ditch traditional green tea and switch to Matcha.

Through a Japanese tea ceremony, I was introduced to the benefits of matcha green tea.  “Matcha” as it is called is a special type of green tea made of the entire leaf.  Consuming the whole leaf provides 100% of the nutrients and 137 times the antioxidant power of regular green tea.  One cup of matcha = 10 cups of regularly brewed green tea in terms of nutritional content.


Benefits of Matcha Green Tea – How It’s Made

The benefits of matcha green tea come from the use of the whole leaf. The leaves are pulverized, creating a green powder.  The green tea powder is then whisked with hot water in a bowl creating a frothy beverage.  In traditional ceremonies, Geishas serve the warm beverage in traditional style.  The preparation and enjoyment is meditative.

The resulting high levels of chlorophyll in Matcha Green Tea not only give this tea its beautiful vibrant green color; matcha is also a powerful detoxifier, capable of naturally removing heavy metals and chemical toxins from the body.

Benefits of Matcha Green Tea – Awaken Mental Clarity

One of the benefits of Matcha green tea is that it creates calm alertness.  l-theanine (an amino acid found in green and black tea) produces a state of relaxation without drowsiness.  With three times as much caffeine than a cup of steeped tea, matcha has about the same amount of caffeine as a cup of brewed coffee.  Switching your morning coffee for the benefits of Matcha green tea will give you the caffeine you are accustomed to without the jitters and mid-morning crash.

Benefits of Matcha Green Tea – Antioxidant Support

Catechins are phytochemical compounds, vital antioxidants which provide the body with metabolic support and stamina. We know that with it’s potent antioxidant properties, a bowl of matcha provides over five times as many antioxidants as any other food. The EGCg catechins, which make up 60% of matcha tea, have also shown to hold antibiotic properties which promote overall health.


Benefits of Matcha Green Tea – Promote Relaxation

The L-Theanine in matcha promotes the production of alpha waves in the brain, which induces relaxation without the inherent drowsiness caused by other “downers.” The L-Theanine also promotes the production of dopamine and serotonin.

Studies of different populations have shown that people who drink Match Green Tea on a regular basis have lower levels of LDL (bad) cholesterol while at the same time displaying higher levels of HDL (good) cholesterol.

Benefits of Matcha Green Tea – Become A Fat Burning Machine

Drinking Matcha Green Tea has also been shown to increase metabolism and help the body burn fat about four times faster than average.

Benefits of Matcha Green Tea – Prolonged Energy

While all green tea naturally contains caffeine, the energy boost received from Matcha is largely due to its unique combination of other nutrients. The increased endurance from a bowl of Matcha Green Tea can last up to 6 hours and because of the effects of L-Theanine, Matcha drinkers experience none of the usual side-effects of stimulants such as nervousness and hypertension. It’s good, clean energy.

Benefits of Matcha Green Tea – Save $ By Making It At Home

If you buy matcha in a cafe, you’ll spend somewhere around $4 a cup. You can make it at home for pennies—here’s how:

1. Heat spring or filtered water

2. Add a few drops of hot water to matcha powder and mix into paste with a spoon

3. Add more hot water to paste mixture and stir. Try 1 teaspoon to 6 ounces of water. Adjust measurement to suit taste.

4. Enjoy!

Benefits of Matcha Green Tea – There’s One Exception

Since the whole leaf is used in the production of matcha green tea, lead contamination could be a concern. Even organically grown green teas have been shown to contain trace amounts of lead. As long as you are not drinking the tea all day every day, you should be okay. We must weigh the benefits vs. the risks and make a decision for ourselves if we want to drink matcha.

Benefits of Matcha Green Tea – Resources:

E-How Matcha

Health

Match Source

WELL – New York Times

Braised Chickpea Curry

Do you get tired of thinking “What should we have for dinner?”

You have enough to think about without the hassle of coming up with something new for dinner each night. We have got you covered. This Braised Chickpea Curry recipe can feed a bunch of people, it’s quick and it’s super flavorful.

What we love about this dish is you can double the batch and freeze the leftovers for a future meal. It is so good you will probably want to eat it a couple of nights in a row…so it might not make it to the freezer.

Braised Chickpea Curry is nutrient dense so you won’t get that hungry feeling an hour after eating. If you have picky eaters in your family, invite them to help you make this meal. It is easy to prepare, making it the perfect dish for kids to help with. They will be more inclined to eat foods they help prepare!

My family thought the Braised Chickpea Curry was so good it was gone before I could take a picture of the final dish. Enjoy!

Braised Chickpea Curry

What You;ll Need:
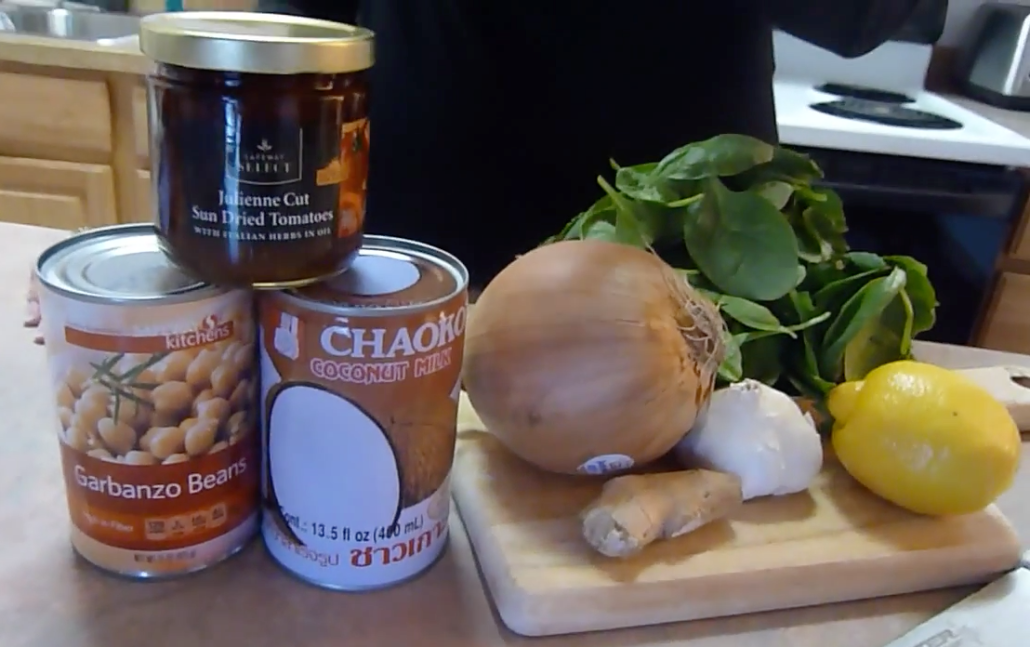
1 yellow onion
4 cloves garlic
1 tbsp fresh ginger
1 whole lemon
1/2 cup sun-dried tomatoes, drained
2 cups cooked chickpeas (1 – 15 oz can)
1/2 tsp chili flakes (or to taste)
1 tbsp coconut oil
1/2 lb fresh spinach
1 – 14 oz can coconut milk
1 tsp ground ginger
sea salt, to taste
freshly ground black pepper, to taste
1/2 bunch cilantro (to garnish)

Braised Chickpea Curry

What You’ll Do:
Heat a large Dutch oven or deep sauté pan over medium heat. Add the oil, followed by the onions and salt. Let the onions sweat for about 10 minutes or until translucent. Once soft, add the garlic and ginger and let cook for another minute. Add the sun-dried tomatoes, lemon zest and chili flakes.

Next, add the chickpeas and stir to coat in the tomato mixture. At this point, turn up the heat slightly braising the chickpeas. Once the chickpeas are heated through, turn the heat down slightly and start to add the spinach, a handful at a time. Once the first bunch of spinach has started to wilt, add in the next handful. Continue until all of the spinach has been added.

Braised Chickpea Curry

To finish the dish, add the coconut milk and bring to a simmer. Stir to combine and then add the ground ginger and a bit of the reserved lemon juice. Taste for seasoning. Add more lemon juice, salt and/or pepper as needed.

Once everything has heated through, serve immediately. Serve it with brown rice or any grain of your choice.

Braised Chickpea Curry

Here is a trick to easily peel ginger. Be sure to check out all of our cooking hacks here.

Cooking Hacks


This recipe is compliments to ROUXBE Cooking School

Problem Solving Strategies

Problem solving strategies help us navigate life’s “problems” or “challenges” when they arise.  The manner in which we respond to the circumstances we face can be seen as either proactive or reactive problem solving strategies. Instead of looking at the issues that arise as negative forces, instead lets view them as learning experiences that can bring about our greatest good.

The next time we are faced with a circumstance that could be viewed as a problem, step back and evaluate the situation at hand. Let’s look at what makes a response proactive or reactive in nature.

Proactive problem solving strategies emphasize active listening skills and seek to bring about a win-win solution for all involved. With proactive problem solving strategies, we access the situation ahead of time and trouble shoot before an issue arises. We take into account that there are multiple ways to solve any given problem.

Reactive problem solving strategies occur as a response to a situation. Typically, it focuses on quick fixes to avoid further reactive responses or issues in the immediate future. Often, reactive problem solving strategies spring forth from a narrow focus, lack of awareness or not listening.

Problem Solving Strategies

When approaching a problem, follow these 6 problem solving strategies to identifying the problem and best course of action.

1. Identify and define the problem. It is important to identify if the problem is real or perceived, if it’s significant, and if it’s an ongoing problem or not.
2. Learn more about the problem. This is the: Who, What, When, Why and How? Gather only the facts about what happened or what caused the problem.
3. Generate solutions. Focus on what you can do. Focus on what needs to be addressed, the best way to resolve the issue and any alternatives.
4. Choose the best course of action, decide how the issue will be resolved.
5. Implement the solution.
6. Assess and follow up if needed. Did the course of action you chose resolve the problem? If not, make necessary changes and keep moving forward.

As we practice proactive problem solving strategies, these actions will become second nature. Make a mental note of how you feel before, during and after implementing the problem solving strategies. In the comments, let us know how these problem solving strategies have helped you.

How To Start A Vegetable Garden

Growing up with a backyard garden and frequenting farmers markets on a weekly basis was one of the best things my parents ever did for me. They taught me a useful skill when they showed me how to start a vegetable garden. From a young age I knew where my food was coming from, how to cultivate the land and a great deal of patience. Not all of us have a green thumb; however, starting your own garden may be easier than you think.

It is important to know that in 1946, over 50% of the produce consumed in America was from our own backyards. Today, more and more of our food is shipped to our grocery stores from thousands of miles away. The worst part is that in order for the food not to spoil, it must be picked before it is ripe. A tomato that is picked before it is ripe is missing 400 micronutrients as compared to a vine reopened tomato. This is one reason we are the most over fed and undernourished country in the world. Today, our food is lacking essential nutrition. Learning how to start a vegetable garden could dramatically impact the health of your family and the nation.

How To Start A Vegetable Garden

Start small. Even if you live in an apartment, you can grow some of your own food. When looking at how to start a vegetable garden, begin by planting a variety of herbs in a windowsill or grow a tomato plant in a planter on your deck. I guarantee that you will be able to tell the difference in the flavor of food you grow versus the items you buy in the store. If organic or heirloom seeds are used along with organic practices, you will be consuming the freshest, most nutrient dense and chemical free foods. Plus, growing your own food will dramatically reduce your grocery bill each month.

A key to success in learning how to start a vegetable garden is watering the plants properly. When planting your garden if the soil can be rolled into a ball, the soil is to moist for planting. If the dirt crumbles through your fingers it is ready for planting. When planting seeds bury them only as deep as their diameter. When you water your plants, the water should not pool on top of the soil. A good rule of thumb is to water for two seconds and then assess if more water is needed. Containers dry out faster than plants in the ground. Make sure there are holes in the bottom of the container you are using so that if you happen to over water the soil can naturally drain. Be sure to water daily in the summer time. The soil should be moist to the touch but not muddy.

Another option to explore is the mini-farm grow boxes Mike Adams of Natural News invented. The Health Ranger has designed a small portable box that makes it easy for the gardening novice to start producing food in their home. The best part is that he shows us how to inexpensively make the mini-farm grow boxes ourselves. These food boxes do not require electricity and many of the items used to make the grow boxes can be found around your house. These food boxes take the guess work out of watering your plants, it comes with a nutrition guide and nutrient packets to produce highly nutritious foods for your family. For more information on these mini-grow boxes, visit FoodRising.org

If you are planting a garden outside the Farmers Almanac has a great resource that outlines the best planting dates for seeds. You can find that resource here.  It’s time to start putting these tips of how to start a vegetable garden to use. As your veggies begin to sprout and you prepare wonderful homemade meals with the family, be sure to share your stories and photographs with us!

Here is a picture of me and my mom getting ready to plant our garden.

how to start a vegetable garden

Eating Healthy On a Budget

Eating healthy on a budget can at times seem daunting.  We may have the idea that it is easy and cheap to eat on the go at fast food restaurants.  It’s not.  It is less expensive to invest in healthy, nutritious food. Chemical laden foods found in fast food restaurants and the highly refined food like substances that take up the entire midsection of the grocery store are poisonous to our bodies.  If we eat like crap, one day we will pay the price for such decisions; in the long run, this makes eating unhealthy more expensive.  We are here to help guide you to items that are both nutritious and wallet friendly.

One of the best things we can do to make sure we are eating healthy on a budget is to shop in the perimeter of the grocery store.  In the perimeter of the store, you will find all the produce, meats and dairy—the real food.  The center isles are typically filled with all the processed crap that is void of any real nutritional value.

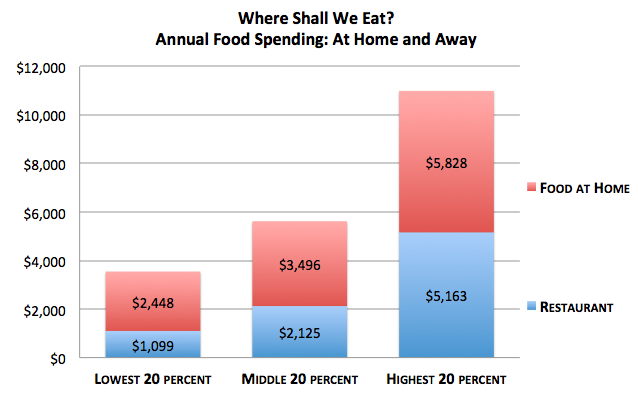
Eating healthy on a budget means you will begin eating more home cooked meals.  When we prepare our food, we know exactly what is or is not going into our food.  Numbers from the U.S. Department of Labor’s Consumer Expenditure Survey shows that Americans spend about half of their food dollars away from home. Eat at home and you’ll save a bundle.

Eating Healthy On a Budget


Eating Healthy On a Budget

  1. Eat more vegetarian meals – Meat can be expensive.  There are many options to attaining protein daily that do not require you to eat meat.  Lentils, beans, quinoa, hemp and chia seeds are great sources of protein that leave you feeling full.  Eating more vegetarian meals lightens your bill.
  2. Stock up when there are sales – When organic products go on sale, be sure to stock up. When we buy items on sale, we instantly cut down on the grocery store bill.  Eating healthy on a budget means we look for and take advantage of the sales that happen weekly. Many items can be stored in the freezer for later use. Think frozen fruits and veggies as well as boxed items like quinoa and beans.
  3. Buy in bulk or direct from companies online – The cost per serving goes down when we buy in bulk.  When we buy directly from the company, we get the best deal as we cut out the middle man.
  4. Make bigger batches – Since we are buying in bulk, we can make a double batch of our favorite meal and store the extra as a freezer meal for later.  This always makes serving healthy food easy when we are crunched for time.  We do not have to stress about what is for dinner; simply pull out the freezer meal and reheat it.
  5. Start a small garden – A small garden can produce a large amount of food, saving us money and providing healthy food for our family.  If you do not have a yard for a garden, consider growing a tomato plant near a kitchen window or plant a herb garden that will flourish in the windowsill.
  6. Shop locally at farmers markets – Farmers markets have great prices on produce and you will get the freshest, local food available to you.  It is important to know where our food comes from. Farmers markets allow us the opportunity to talk to the people growing our food so we know exactly what we are getting.
  7. Don’t shop when you are hungry – When we are hungry and go shopping, we often buy items we otherwise would not choose.  Everything looks good so everything ends up in the cart, which can be costly.
  8. Recreate left overs – Instead of tossing out leftovers, recreate the food into another meal and reduce food waste.  If you make a big batch of quinoa and veggies as a side dish one evening, think about making stuffed peppers the next night using the quinoa and veggies.  If you have left over roasted chicken, make soup with the left overs.  There are endless ideas to making leftovers more exciting.

Eating healthy on a budget is an attainable goal with these 8 tips.  We would love for you to share your tips for eating healthy on a budget in the comments below.

Healthy Fruit Snacks – Strawberry Lemonade Hearts

Healthy fruit snacks are easy to make at home. When we make our own healthy fruit snacks we know exactly what we are eating. We can avoid ingredients like HFCS that are in so many store bought fruit snacks. The best part is that we can make any flavor we want. Want healthy fruit snacks that are blueberry flavor? Substitute blueberry puree for the strawberry in the recipe or use a cup of fresh squeezed orange juice for orange flavored healthy fruit snacks. Feel good about sharing these healthy fruit snacks, these hearts are full of love.

Healthy Fruit Snacks  Healthy Fruit Snacks

What You’ll Need:
1 cup pureed organic strawberries
1/3 cup organic lemon juice
2 tablespoons raw honey
3 envelopes grass feed gelatin or Knox gelatin, unflavored

What You’ll Do:
To puree the strawberries, place them in a blender on high. No need to add water, the juice in the strawberries is enough. Over low heat mix the strawberry puree, lemon juice and honey together. Slowly add the gelatin powder into the mixture whisking constantly until dissolved. Avoid adding all the gelatin at once as the mixture will become clumpy. Place the molds on a baking sheet so it is easier to move from the counter to the freezer. Pour the mixture into a spouted measuring cup for easy distribution into your silicone molds. Put the fruit snacks in the freezer for 10 minutes. Remove and pop the fruit snacks out of the mold. Place in an airtight container and store in the refrigerator for up to two weeks.


Healthy Fruit Snacks*We suggest using organic products. Strawberries are on the Environmental Working Group’s Dirty Dozen list. Sixty-five different pesticides, fungicides and herbicides are registered for use on strawberries in the US. Strawberries have been found by the USDA Pesticide Data Program to have up to 45 pesticide residues in the fruit on average. Pesticides can have harmful effects on the body and can accumulate in the body over time. For more information on the Dirty Dozen visit ewg.org

Brewing Kombucha At Home

Probiotics have been in the news a lot lately. If you have not received the memo on the importance of probiotics, let this be that memo. The literal translation of probiotic is: pro- “for” + biotics “life” – for life!

Probiotics boost the good bacteria in your digestive tract, can help heal a multitude of health issues, detox the body, and can even lead to weight loss, better skin, and boosted immunity. The health of our gut largely determines our overall health.

Our favorite way to consume probiotics is through drinking kombucha. It is a great bubbly alternative to drinking soda and has health benefits. You can buy kombucha at health food stores or make it at home for pennies. Brewing kombucha at home is easy.

There are a lot of starter kits you can buy online that come with everything you need to start brewing kombucha. Many local health food stores have patrons which brew their own kombucha and provide you with a SCOBY (Symbiotic Colony of Bacteria and Yeast) and tips to to make your culture a success. Lets begin brewing kombucha at home.

Brewing Kombucha At Home

To make kombucha all you need is:
1 gallon of purified water
8 organic tea bags (green or black)
1 cup of sugar
SCOBY
1 gallon glass jar
cheese cloth or old t-shirt

When brewing kombucha at home this is what you’ll do:
Boil 8 cups of water in a large pot. Add the tea bags and steep for 20-30 minutes. Remove the tea bags. Add the sugar and stir well. Allow the mixture to cool to room temperature. Once cool pour the tea into the clean gallon glass jar. Add 8 cups of water to the jar and the SCOBY. Cut out a section of the t-shirt to fit over the opening of the jar. Cover the top of the jar with the t-shirt, secure it with a rubber band. Place the jar in a cool dark place for 7-14 days.

The time it takes for the kombucha to ferment depends on many factors. After 7 days begin checking the fermentation process. Move the SCOBY to the side and with a clean spoon, sample the tea. The tea will begin to self carbonate. The mixture can be sweet or sour in flavor depending on your preference and how long you allow it to ferment.

At this point you can enjoy your kombucha or do a second fermentation process to which you add flavors to your tea. You can create any flavor you desire; each flavor has a different process. Just Google the flavor you want and follow the instructions. If you opt not to add a flavor, you can begin your next batch of kombucha. Congratulations on brewing kombucha at home. In the comments share with us what is your favorite way to add probiotics to your diet. If you found this article interesting read more about cultured foods.

Brewing Kombucha At Home

Easy Homemade Cleaners

A place where many harmful toxins are found in our homes is in cleaners, soaps and even our laundry detergent (when you wear your clothes and sleep in your bed these chemicals can transfer from the fabric and be absorbed by your skin. If your skin consistently breaks out this could be a reason why). These items are loaded with synthetic chemicals shown to pollute indoor air and harm our health. There are some great cleaners like 7th Generation which can be found at stores like Whole Foods which you can switch to as well. Here are some simple cleaners you can whip up at home. easy homemade cleaners

Easy Homemade Cleaners easy homemade cleaners

Simple Vegetable Cleaner easy homemade cleaners
Cleaning your fruits and vegetables is a must with all the harmful chemical pesticides that are sprayed on our foods these days. Here is a simple and inexpensive way to clean your food before cooking it. easy homemade cleaners

You will need: 1 lemon, 2 tablespoons white vinegar, 1 cup water, 1 spray bottle

Juice the lemon and pour it into the spray bottle with the vinegar and water. Mix well by shaking the bottle, make sure the cap is on tight. Spray your fruits or vegetables and let them sit for a minute. Rinse under cool water while rubbing the skin of the fruit. The added friction ensures the break up of the chemicals. easy homemade cleaners


Simple All Purpose Cleaner
Fill a one quart jar with orange peels. Add white vinegar to cover the orange peels. Let the mixture sit for a week to 10 days. Strain the liquid into a spray bottle. Use on counter tops, tables or anything that needs to be cleaned. Cats are not fond of the essential oils found in oranges so spraying counters will keep your feline friends off your work area. easy homemade cleaners


Laundry Soap easy homemade cleaners
1 box of Arm & Hammer Super Washing Soda
1 box of 20 Mule Team Borax
10 Pack of 4.5 oz bars of Dr. Bonners soap bars

All of these items are found in the laundry isle at your local grocery store. Finely grate the soap bars. In a large container add all 3 ingredients and mix thoroughly. 1 tablespoon = 1 large load of laundry. This makes laundry less expensive to do and will last you months. easy homemade cleaners